Technicians You Can Rely On
Prompt. Professional. Reliable.
Exceed your patient’s expectations withOngoing Dental Equipment Support & Training
Whether your practice is situated in South East QLD, Central QLD or Northern NSW, Dental Depot has you covered. We offer ongoing dental equipment support to all of our customers, including training, technical support, emergency support and servicing of equipment.
A solution that fits your dental equipment support needs.
We want to help you get the most out of your equipment and ensure you find a solution that fits your needs – that’s why we offer training for your staff. During these sessions, we will outline how to maintain your equipment, control infection and the process involved in sterilisation. We regularly run courses out of our Windsor office if your staff require a more in-depth training program.
Dental Depot will support you all the way.
We also offer emergency assistance and dental equipment support for all of our equipment. So you can rest assured that we will be there to fix any technical problems as they occur, all you have to do is give us a call. Our client web portal Makes ordering your consumables simple and easy.
Our Resources
Click through the tabs below for advice on dental equipment support, and how to keep your practice running smoothly!
Dental Equipment Extended Shutdown Protocols
Dental Equipment Extended Shutdown Protocols
For a comprehensive list of shutdown protocols, please click the link below.
Shutdown ProtocolsW&H Lisa Filter Replacement
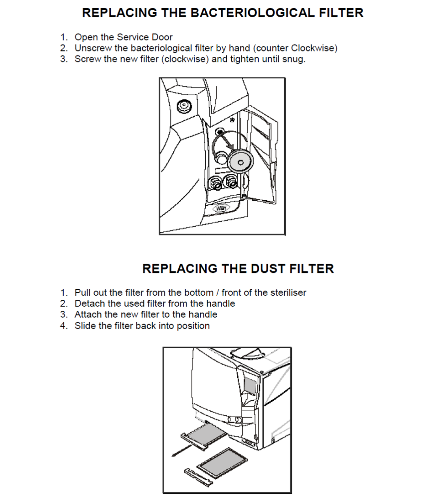
W&H Lisa Autoclave User Maintenance
Daily
- Switch on Lisa and then printer
- Drain used water tank (Grey port) and fill fresh water tank until beep is heard
- Wipe door seal over with mild detergent or alcohol base removing any lint if present
- Run Vacuum test in service menu (17 minutes)
- Run Bowie and Dick test in Service menu (22 minutes)
- You are now ready for the first cycle of the day
Cycle selection
- From the ‘Select a cycle’ screen tough the icon in the bottom left hand corner of the screen
- Select the appropriate cycle for your load by using the up or down arrows on the right hand side of the screen. If instruments are bagged you may select the Flash/Unwrapped or B standard 134 cycle
- Select the icon in the bottom left corner once you have made your selection
- Touch the large icon in the centre of the screen to commence your cycle.
Weekly
- Remove tray and tray rack, wipe chamber using a mild detergent with a lint free cloth
- Wipe the chamber again using water only and a lint free cloth removing any trace of detergent
- Wipe the outside of the Lisa with a mild detergent
Six Monthly
- Drain both the fresh and grey (used) water tanks from the drainage port behind the service panel
- Fill the fresh water tank with 2.8 litres of distilled or demineralised water
- Add 200 ml of 90% alcohol to the 2.8 litres in the fresh water tank
- Allow to take effect for 30 minutes
- Drain the fresh water tank into a clean container and using this mixture repeat the above procedure with the grey (used) water tank and then discard this water
- Fill the fresh water tank with distilled or demineralised water and run an empty cycle
- You are now ready for your next cycle.
All other information regarding Lisa functions can be found in the instruction manual provided with the machine.
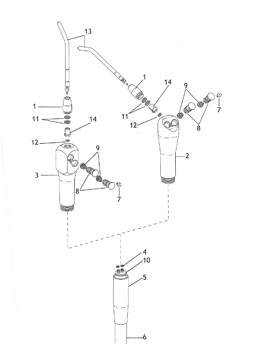
Autoclavable Traditional and Continental Syringe
| Item | Part Number | Description |
|---|---|---|
| 1 | 23-1112-00 | Nut assembly, Syringe, Smooth |
| 2 | 23-1190-00 | Syringe head, Traditional |
| 3 | 23-1097-00 | Syringe head, Continental |
| 4 | 030-002-00 | O-Ring |
| 5 | 23-1015-00 | Syringe Handle |
| 6 | 024-194-00 | Tubing Assembly |
| 7 | 23-1193-01 | Screw, 2-56 |
| 8 | 23-1232-01 | Valve. Assembly button, autoclavable |
| 9 | 013-064-01 | Spring, compression, conical |
| 10 | 23-1110-00 | Terminal, 2 Barb, No Quick Disconnect |
| 11 | 035-048-00 | O-Ring, E, .114 ID x .070 W |
| 12 | 034-003-01 | O-Ring, E, .056 ID x .060 W |
| 13 | 23-0872-01 | Syringe tip |
| 14 | 23-1101-00 | Spacer, Syringe nut |
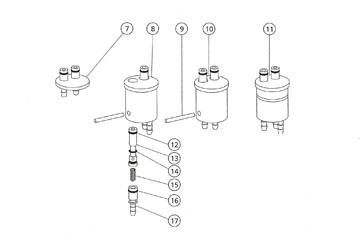
Syringe Terminal Barb Assemblies
| Item | Part Number | Description |
|---|---|---|
| 7 | 23-1110-00 | Terminal Barb |
| 8 | 23-1066-00 | Syringe head, Traditional |
| 9 | 011-038-01 | Syringe head, Continental |
| 10 | 23-1067-00 | O-Ring |
| 11 | 23-1185-00 | Syringe Handle |
| 12 | 030-002-00 | Tubing Assembly |
| 13 | 23-1064-00 | Screw, 2-56 |
| 14 | 035-025-01 | Valve. Assembly button, autoclavable |
| 15 | 013-003-01 | Spring |
| 16 | 035-028-01 | O-Ring, Spcl E, .110 ID x .040 W |
| 17 | 23-1068-01 | Term Barb Assy w/O O-Rings |
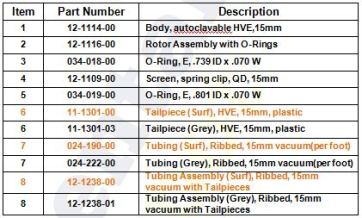
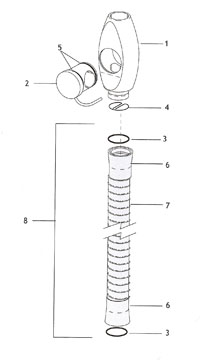
Adec 300/500 Autoclavable HVE with Large Bore (15mm)
Adec Dental Chair Bleach Procedure
Dental Unit Waterline Treatment: Bleach Protocol Instructions for Use
(IFU) Disinfectant Solution:
A disinfectant solution of one part household bleach (5.25% sodium hypochlorite) plus nine parts of treatment water is recommended. This 1:10 (one-in-ten) solution should be used in all bottle and waterline asepsis protocols outlined below.
Using the following procedures, 100 ml (3.3 oz.) of the 1:10 disinfectant solution is a sufficient amount to treat one system or one bottle (100 ml for disinfection of the bottle and 100 ml for disinfection of the system). If you are treating one system at a time, simply mix 10 ml (about 1/3 oz) bleach with 90 ml (about 3 oz) treatment water. To treat more than one system, use the same ratio to mix additional solution. Always prepare fresh solution for each treatment.
Bottle Disinfection
To disinfect an A-dec water bottle, pour 100 ml of the 1:10 solution into the bottle, cap and shake for approximately 5 seconds. Allow the bottle to stand for ten minutes. Shake the bottle again. Empty the bottle and rinse twice with treatment water.
System Disinfection:
- Make certain the unit has been purged with air
- Make sure that the handpieces have been removed from the tubings before purging the system
- Remove and empty the treatment water from the installed water bottle, then reinstall it
- Hold handpiece tubings and syringe over a basin or bucket. Turn the unit on, wait a few moments, then operate the unit flush valve, syringe, and foot control until the water is purged form the system
- Turn off the unit
- Fill and flush with disinfectant
- Make sure the unit is off. Remove the empty water bottle and set it aside for disinfection if you have a spare water bottle. If not, disinfect water bottle before disinfecting the system.
- Add approximately 100 ml of the 1:10 disinfectant solution to a disinfected bottle. This will be referred to as the disinfectant bottle
- Hold handpiece tubings and syringe over a basin or bucket. Turn the unit on, wait a few moments, then operate the unit flush valve, syringe, and foot control until a steady stream of disinfectant solution begins flowing through the tubings (about
15-20 seconds)
- Allow disinfectant to remain in the unit for at least 10 minutes but never more than 30 minutes
- Purge the unit with air
- Hold handpiece tubings and syringe over a basin or bucket. Turn the unit on, wait a few moments, then operate the unit flush valve, syringe, and foot control until the disinfectant solution is purged from the system.
- Turn off the unit.
- Fill with treatment water
- Make sure the unit is off. Remove the empty the solution from the disinfectant bottle. Then install a disinfected bottle filled with treatment water. If using the same bottle, empty the contents of the bottle, rinse twice with treatment water then fill with treatment water and reinstall.
- Hold handpiece tubings and syringe over a basin or bucket. Turn the unit on, wait a few moments, then operator the unit flush valve, syringe, and foot control until a steady stream of treatment water begins flowing through the tubings (about 20-30 seconds).
- Your dental unit is now ready for use.
Miele Disinfector Shutdown including Emptying Dispensing System
Putting A Disinfector Washer Out Of Operation Including Emptying Dispensing System
Instructions:
Putting the dishwasher out of operation for a long time (greater than 3 months) with emptying dispensing system. If the machine is not to be used for an extended period of time, please carry-out the following steps.
- Remove all load from machines baskets and inserts
- Remove the filter combination and clean coarse, fine, microfine and flat filter
- Clean the non-return valve and drain pump impeller
- Re-insert the non-return valve and filters
- Clean filters at mobile units accordingly
- Take out the suction lances from process chemical containers
- Arrange suction lances upside down and in a high position to allow the liquid to run down in the direction of the machines dispensing pumps by gravity
- Activate dispensing pumps to remove process chemical from suction lances and hoses
- Use a sufficient container with Demineralized water and arrange suction lances in the container
- Activate dispensing pumps to rinse process chemicals residues from suction lances and hoses
- Remove the suction hoses from the container
- Arrange suction lances upside down and in a high position to allow the liquid to run down in the direction of the machines dispensing pumps by gravity
- Activate dispensing pumps to remove residue from suction lances and hoses
- Carefully dry the suction lances with a towel. It is recommended to cover the suction lances separately with a suitable plastic bag
- Run the Rinsing programme (cold wash cycle) This will ensure that any traces of process are dissolved and rinsed away
- Remove the filter combination and remove residual water using a syringe or sufficient sponge. Finally use a towel for proper drying
- Re-insert the filters
- Close the onsite water intake valves
- Inform the user not to close the machines for at least 12 hours
- Switch the machine off using the On/Off button at the machines control panel
- Switch the machine off at the on-site main switch / fuse breaker
Putting The Dishwasher Back Into Operation After A Period Of Non-Use
Instructions:
- Open the water intake
- Switch on the on-site main switch/fuse breaker
- Open the machines door
- Check the machine and baskets/mobile units according to the list for daily routine checks
- Check all screw connections in the wash cabinet for proper tightness
- Fill the built-in chemical containers with process chemicals and connect the suction lances
- Switch the dishwasher on
- Vent/prime the dispensing system
- Run the Rinsing programme (cold wash cycle) to ensure any traces of process are dissolved
- Run a standard disinfection cleaning programme
Miele Disinfector Shutdown
Putting A Disinfector Washer Out Of Operation Without Emptying Dispensing System
Instructions:
Putting the dishwasher out of operation without emptying dispensing system. If the machine is not to be used for an extended period of time, please carry-out the following steps.
- Remove all load from machines baskets and inserts
- Remove the filter combination and clean coarse, fine, microfine and flat filter
- Clean the non-return valve and drain pump impeller
- Re-insert the non-return valve and filters
- Clean filters at mobile units accordingly
- Run the Rinsing programme (cold wash cycle) This will ensure that any traces of process are dissolved and rinsed away
- Remove the filter combination and remove residual water using a syringe or sufficient sponge. Finally use a towel for proper drying
- Re-insert the filters
- Close the onsite water intake valves
- Inform the user not to close the machines for at least 12 hours
- Switch the machine off using the On/Off button at the machines control panel
- Switch the machine off at the on-site main switch / fuse breaker
Putting The Dishwasher Back Into Operation After A Period Of Non-Use
Instructions:
- Open the water intake
- Switch on the on-site main switch/fuse breaker
- Open the machines door
- Check the machine and baskets/mobile units according to the list for daily routine checks
- Check all screw connections in the wash cabinet for proper tightness
- Switch the dishwasher on
- Vent/prime the dispensing system
- Run the Rinsing programme (cold wash cycle) to ensure any traces of process are dissolved
- Run a standard disinfection cleaning programme
We also offer training in dental equipment support, maintenance, infection control, sterilisation process and more.
